Preparing for puppy

Bringing home a new puppy is exciting, but can be overwhelming! Here are lots of tips on what to procure ahead of time, easing the transition from the breeder’s home to yours, and setting up for a peaceful household.


What you’ll need

  • Food - ask your breeder what brand of food they are feeding the puppies. They may send you home with some, or they may expect you to get a bag of your own. You’ll keep your puppy on the same food at first, so you don’t upset their digestion, then transition to a different brand slowly (if you want to).

  • Bowls for food and water. You may want a “slow feeder” bowl for puppies that gulp their food quickly.

  • Treats (see this article for tips on selecting treats).

  • Toys - get toys with a variety of sizes, shapes, and textures. Your pup’s toy preferences may change as they are growing and teething, and you’ll want to have various on hand to discourage mouthing and chewing on furniture.

  • Food toys and edible chews, to keep your pup entertained (see this article for suggestions).

  • Collar and harness, for walking and tethering in the car (or use a crate). If you’re not sure what sizes to get, ask your breeder to give you a measurement of the circumferences of the pup’s neck and rib cage shortly before it’s time for pick up. I recommend a harness because it will be safer to use for teaching leash walking.

  • Crate, if you’ll be using one. Crates are very helpful for potty training, chew training, and generally keeping your puppy out of trouble when unsupervised. Larger wire crates usually come with dividers, so you can get one that will fit your dog when full grown, and make it temporarily smaller for the puppy.

  • Baby gates and x-pens (example), to block off areas of the house or keep your puppy contained during potty training and chew training. These can be used instead of a crate, or in different areas of the house.

  • Potty pads, if you plan to use them. (You could instead commit to taking your puppy outside for every potty break, right from the start.)

  • Bitter tasting spray (such as Bitter Yuck or Bitter Apple), to deter chewing on furniture.

  • A big plush toy, to help your puppy settle when alone.

  • Dog beds, blankets, or towels. You may not want to get anything too fancy early on, when your pup may be pottying or chewing on their bedding.

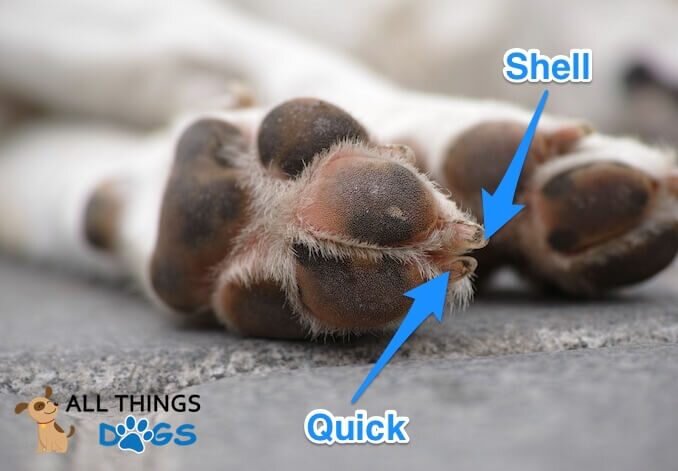
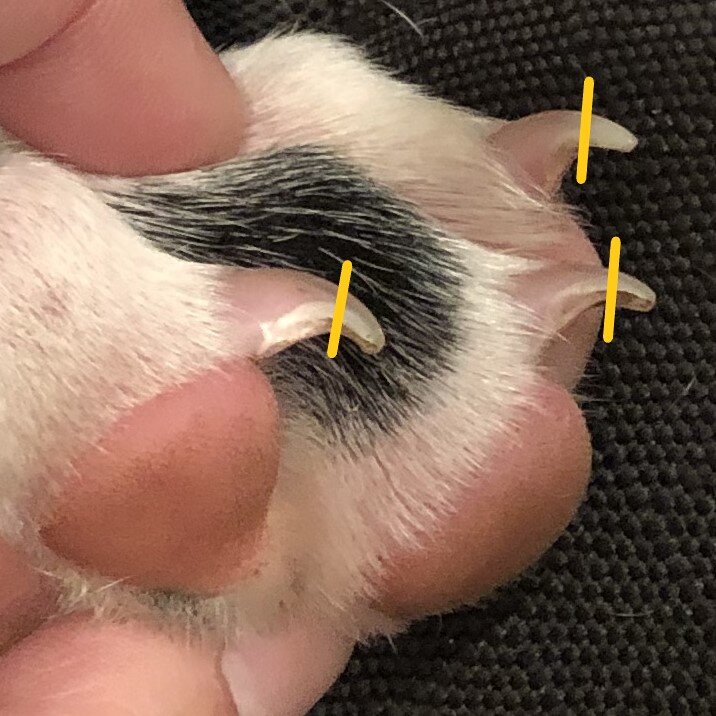
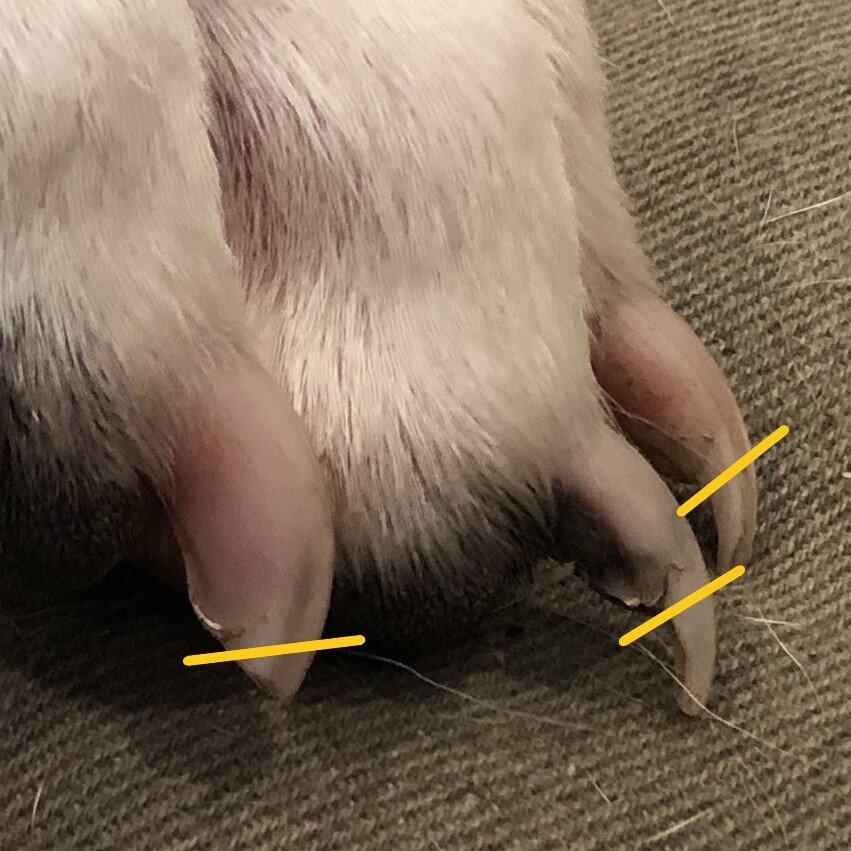
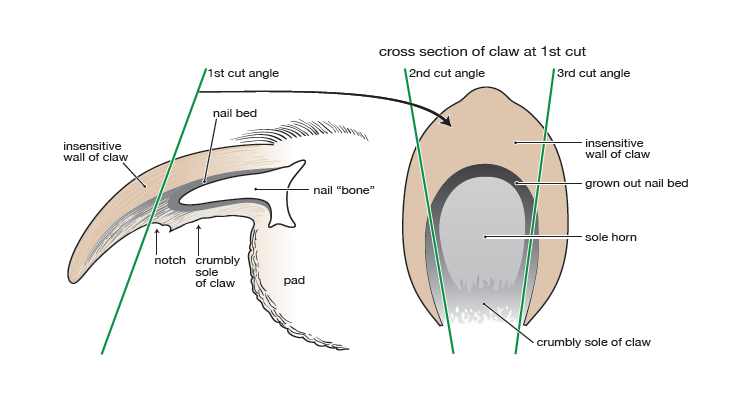
  • Grooming tools. Long-haired dogs will need regular brushing to keep from matting. Dogs with poodle/doodle-type coats will need to be trimmed regularly - you can take them to a professional groomer or do this yourself. You’ll also need to trim your dog’s nails - here is an article all about nail trims.


Transitioning from the breeder’s home

  • Ask your breeder whether they will be sending a toy or blanket home with the pup, so they have a familiar item to provide comfort. If not, ask if you can drop off or mail them a small blanket to put with the puppies, and then bring back home during pick up.

  • If possible, visit the puppies at least once before you bring yours home. Spend some time playing with the pups and making a good first impression.

  • During the car ride home, have the pup sit next to someone or on their lap. In the long term, you’ll want to have your pup safely secured in the car (using a crate or tether), but that’s very hard on most puppies during their first trip without littermates. If you are alone, secure your pup on the passenger seat so that they can see you and get reassuring petting when safe. Never allow a puppy to sit on the driver’s lap, as they may interfere with steering or fall down near the pedals.

  • Let your pup investigate their new home without immediately meeting other pets - one thing at a time! Don’t let kids accost the pup while they’re still figuring everything out. (Use the resources in this article to teach kids to be respectful of dogs.)

  • Do not allow your puppy to overwhelm or bully more timid or defensive animals (like other small dogs, cats, rabbits, or chickens), or be overwhelmed by older/larger dogs. (Article on introducing dogs to each other and to other animals is in the works.)

  • Set up areas where your pup will be confined when unsupervised (eg crate, pen), and where they will be hanging out with you. Don’t give them free reign of the entire house at first, to minimize potty accidents and chewing on furniture/your stuff.

  • Get your puppy on a regular schedule over the course of the first week.

  • The first few nights can be very stressful for the puppy, who is not used to sleeping alone, and for the human, who has to listen to their pup whining and crying. The large plush toy will give them a faux littermate to cuddle up to, and a blanket that smells like the breeder’s home will help comfort them. If your pup is sleeping in a crate, place it on your bed or immediately next to it. Place your fingers through the bars and talk softly to your puppy.


When to start training

Remember that your pup is constantly learning about interacting with humans, how to play, how to be alone, and so on. You’re training from the first minute you bring them home! If getting your puppy settled into your home is a struggle, don’t hesitate to reach out for help. Formal obedience training (like sit, stay, come, leash walking prep) can begin right after.

Print Friendly and PDF
In

Strangers in the Home

Dogs who are anxious or fearful of strangers struggle when those scary people enter their own home. Knocks at the door or the bell ringing often results in a mad dash to the front door and fierce barking. Some dogs will calm down after a while, only to start up again as soon as the guest gets up from the couch, or returns from using the bathroom. Here’s what you need to know when addressing this problem.


Connections with leash reactivity

Most dogs who are scared of people entering their home are also leash reactive around strangers. Please read through this article all about leash reactivity, whether or not your own dog lunges or barks on leash when passing strangers. The underlying principles will be the same during training in your home.

Go ahead and read part two (Foundation Training) and part three (Training Around Triggers) as well. You will want to teach your dog the same exit strategies, and we’ll be using the same principles of desensitization and counter-conditioning, the Engage-Disengage Game, and possibly BAT and the Play Way.

For dogs who are indeed reactive to strangers on leash, I like to address this problem first. I find that it’s easier to teach a dog to accept a stranger coming into their home if they have already learned to trust that people just walking by on the sidewalk won’t hurt them. This part is usually faster and easier. You can still get a head start on desensitization and counter-conditioning to triggers associated with the door (see below)


Management

As noted above in the leash reactivity overview, management (preventing your dog from rehearsing the unwanted behavior) is critical to success. That means that you need to keep your dog from barking out the window. Some options are:

  • Close blinds

  • Cover windows with privacy window film

  • Use pens and gates to keep your dog back from windows

In addition, don’t leave the dog out in the yard unsupervised. When outside with your dog, immediately interrupt any barking that happens and put your dog back in the house.

Cover your doorbell with a paper or cardboard, or purchase a smart doorbell that doesn’t give an audible tone and just notifies your phone that someone is at the door. Place a sign on your door that asks people to text or call you when they arrive instead of knocking, and for packages to be left at the door without any knocking.

Avoid having guests over during the training process, or put your dog in a back room before they arrive. Play some calming music or white noise for him, and give him a stuffed food toy or chewy to entertain him.

If your dog has ever nipped or bitten someone, you should be using a muzzle during training. Start on muzzle training ASAP - see this article for resources.


Meeting guests outside

Some dogs do much better with accepting a new person coming into the home if they are able to greet them out front or in the backyard. In this case, we will be using the leash reactivity training exercises to do a slow introduction to the new person, then have them go into the house ahead of the dog. This can either become the permanent new routine for greeting guests, or it can be a temporary measure while you work on the exercises listed below.


Triggers associated with guests entering

In order for your dog to calmly greet people at the door, we need to teach him to be calm about everything leading up to it - the doorbell, knocking at the door, his owner suddenly getting up and approaching the door, and opening it up. The most straightforward approach to this part of the training is pairing high value treats with the sounds and activities that currently set your dog off in a barking frenzy. Here is a great video by Emily Larlham showing you how to break this process down into little steps:

You’ll need to work on this separately from having people over. Be patient - the more your dog has a history of getting worked up about activity at the door, the longer - and more carefully - you will need to do the counter-conditioning process to reach success.

We may also choose to have your dog go to a station near the door and stay there as you open the door and welcome guests in. This would be integrated with the counter-conditioning process above.


People approaching the home

We can work on this part of the training without worrying about any of your dog’s triggers around the door itself, by having your dog in the house and on leash, with the front door already wide open. We’ll recruit a helper to play the role of a guest approaching, and break the process down further by having them start out just standing on the sidewalk, then taking just one step toward the door before retreating, then two steps, and so on. Your dog will be learning to play the Engage-Disengage Game while this happens. Eventually your dog will be able to watch calmly as someone walks all the way to your front door and enters the house.


Guests within the home

You can now have someone come into your home - hooray! But that doesn’t mean that your dog will be comfortable right away with the guests walking around, playing an active game, or petting the pup! Here are common triggers involving guests within the home that we will continue desensitizing the dog to:

  • Standing up from a couch/chair

  • Walking out of sight and reappearing

  • Telling an animated story or reacting to a game

  • Hugging their owner

  • Making during eye contact with the dog*

  • Approaching the dog*

  • Petting the dog*

* Note that some dogs cannot progress to the point of allowing new people to approach and pet them, and that’s okay - we will teach them to quietly ignore the guests and receive the same in return.

If your dog has ever nipped or bitten a guest, they will be wearing a muzzle when guests enter the home. Depending on the details of your dog’s behavior and previous aggression, you may be able to remove the muzzle once your dog accepts a particular guest into their trusted “inner circle.”


Prognosis

As you can see, teaching your dog to calmly accept strangers entering his home will be an involved process, but it can be done. It will require recruiting a series of helpers who are good at following directions. While you are in the training process, you will need to work around your dog’s needs and avoid having people over, or put the dog away first. The payoff will be a happy, calm family member who is a delight to guests for years to come.

Exactly how long it will take depends on how worked up your dog gets, how fearful or anxious he is, how often you practice, and how well you execute the training plan. I have worked with owners who were shocked to see that after a month of training, their dog was able to sit quietly by their side as a brand new helper waltzed through the front door and took a seat on the couch. Other owners decided that it wasn’t worth the effort to teach their dog not to freak out at activities around the front door, and had all guests greet the dog in the front yard first, then enter the house after the initial excitement had passed. Still other owners kept up the training for several months before it all came together.

We will be doing a series of private lessons in which I teach you, the owner, all you need to know so that you can continue working with your dog to your desired level of success. I will also provide ongoing support after the lessons are done, to troubleshoot any issues that come up.

Print Friendly and PDF
In

Nail Trimming

Why do nail trimming and training at home?

Many clients are scared of trimming their dog’s nails, but it’s worth putting in the effort to learn how to do it yourself, and train your dog to allow it without fussing.

  • You can keep up with trimming more frequently, which is important for nail and foot health. Nails that are too long will push your dog’s toes upwards from the floor, which can cause pain and decrease stability. They are also more likely to get caught on something and get split, broken, or ripped off, requiring a vet visit.

  • Long nails can scratch painfully if a dog jumps on you.

  • You can do just one paw - or even just one nail - at a time to keep the experience short and sweet, which helps with training success.

  • You can save money by doing trimming at home.

  • If your dog is uncomfortable with nail trims, outsourcing the task to your vet or groomer will set them up to be the “bad guy.” It’s so much safer and easier on both your dog and the professional working with them to have a relaxed, cooperative experience.

    • Being forced to suffer through a nail trim in the name of “getting the job done” can be traumatic and make future nail trims more and more difficult and dangerous.


The anatomy of dog nails

Before you start, you need to understand the shape and anatomy of your dogs’ nails. The outside cuticle is the part you’ll be cutting back. On the inside is a blood vessel (called the quick) and nerve. You want to avoid cutting into the quick because it will be painful and bleed a surprising amount.

Image from https://standardpoodleowner.com/poodle-grooming/anatomy-dog-nails/

Image from https://standardpoodleowner.com/poodle-grooming/anatomy-dog-nails/

Image from https://www.allthingsdogs.com/dog-anatomy/

Image from https://www.allthingsdogs.com/dog-anatomy/

There are a few ways to know that you are getting close to the quick. With white nails (as above), you’ll be able to see the pink blood supply, especially from underneath. With black nails, you’ll still be able to see the difference in texture between the hard outer cuticle and the inner part of the nail from below. In addition, between the quick and the outer wall is a white, chalky layer, easily visible in dark nails. If you cut (or dremel) a little bit at a time, you’ll see this layer and know to stop. More pictures of black nails here.

Puppy nails are particularly easy to trim. You’ll see the main part of the nail form a triangle shape, with a sharp point on the front. You can safely cut off that sharp point, and leave the triangle intact.

coffee cuenca 07b.jpg

On older dogs whose nails were shorter and have recently grown out, you’ll see a similar change in shape with a little notch and a narrower front part of the nail.

calvin cuenca 01b.jpg
Image from https://gingercavalier.com/blog/how-to-cut-dogs-nails/

Image from https://gingercavalier.com/blog/how-to-cut-dogs-nails/


Here are three videos that provide good close ups of the trimming process, showing you where to cut and what to look for - this is helpful when using a dremel, too:


Tools and options for trimming nails

There are two kinds of clippers, known as scissor style and guillotine style. Personally, I do not like the guillotine style, as I find it harder to see what I’m doing. My favorite brand of scissor style clippers is from Safari (small and large sizes), and another popular brand is Miller Forge. Note that both of these brands, and many others, include a “guard” that supposedly keeps you from cutting too far and getting the quick. DO NOT use this, as it doesn’t account for individual variability in size and length of dog nails. Instead, use the information above and learn how to tell where each nail’s quick is.

Some people prefer to use a dremel, which is a rotary tool that can sand down your dog’s nails. Many people find that they can more easily see the quick coming and stop before they cut into it. Some dogs are more relaxed with the dremel, if they have previously been cut by clippers. However, many dogs find the noise of the tool to be scary, so you may have to teach them to be okay with it (see videos below).

If you really keep up with nail maintenance, you can use a file or buff to take a little off regularly and keep them very short and smooth (and way less painful when the dog jumps on you!).

20-07-02_scratchboard2.jpeg

A final option is teaching your dog to file his nails down all on his own! (See training videos below.) You’ll need to make or purchase a scratch board: a plank of wood covered with sandpaper. This is a great option for dogs that like training games, or who are particularly anxious about their nails being handled. The downside is that it’s much more difficult to train them to scratch on it with their back feet, compared to their front feet.

No matter what, you should always have styptic powder on hand during trims, in case you do cut into that quick. It promotes blood clotting and will stop your dog from dripping blood everywhere he walks. A common brand is Kwik Stop. Cornstarch can be used in a pinch. You can hold your dog’s bleeding nail in the container, or pinch some between your thumb and pointer finger and hold that tightly to the cut.


Video tutorials

If you have a puppy, start nail trim training right away! As shown above, it’s easy to see how far you should cut when they are young. If your pup is already trusting and good with handling, go ahead and get trims done while they are relaxed and sleepy.

If your pup doesn’t make it that easy for you, you’ll want to go through the process of desensitization and counter-conditioning to teach them to be comfortable with handling their paws and using your trimming tools. Here is an article all about D/CC. Make sure that you know the difference between just playing with your dog’s paws versus actually desensitizing your dog to handling:


Here is a helpful video on desensitizing your dog to paw handling, before you even bring out the trimming tools:


And one that starts with paw handling, and progresses through nail trimming:


*Note that you can combine traditional desensitization and counter-conditioning with the Bucket Game.


For extra ease of trimming, you can teach your dog to lie upside down between your legs, which gives you a great view of what you’re doing:


Here’s a desensitization tutorial for introducing the dremel:


And a few ways to introduce a scratch board and teaching your dog to file his own nails:

Print Friendly and PDF

Leash Reactivity: An Overview

What is it?

“Leash reactivity” refers to the overreaction of a dog when he sees other dogs or people while out on walks. The dog may pull, lunge, jump, whine, bark, or growl when he sees the trigger. There are a few different forms and causes of leash reactivity:

  • Frustration over being held back by the leash: some dogs really want to run up to the other dogs/people. Their over-excitement turns to frustration, and becomes so intense that it looks like aggression.

  • Anxiety or fear: some dogs are anxious about interacting with other dogs/people, and are taking the approach of “best defense is a good offense.” The leash may be causing the anxiety, as they are unable to control their speed and direction of approach.

  • Many dogs feel a combination of both frustration and anxiety.

  • It's common for dogs that display leash reactivity to be much more relaxed when they are off leash around the same triggers, because they have more control over the situation.


How do we fix it?

In order to reduce the undesirable behavior the dog is showing, we need to change the underlying emotions that are causing it. This means that we need to reduce the dog's anxiety or fear, teach him coping skills to deal with the frustration and/or anxiety, and help him redirect his energy to a more appropriate outlet.

It is crucial to not rely on punishment to simply stop the reactivity. Punishment often makes the problem worse over time, since you will be increasing the dog's anxiety. Although you can punish a dog until he stops barking at triggers if you are harsh enough, you can end up with what is called a “silent biter” - a dog who doesn't give any warnings because he is afraid of punishment, but strikes “out of the blue” when he feels he truly needs to defend himself.


Management

The first step is to scale back your dog's exposure to triggers so that you can implement a training plan. The more your dog experiences feeling frustration/anxiety around other dogs/people, the more ingrained the leash reactivity will be. While you are training, you should avoid coming close enough to dogs/people that your dog displays the reactive behavior. That might mean crossing the street, or even immediately turning around when you see other people.

You should also prevent your dog from having chances to rehearse reactivity from behind windows, fences, and in the car, as these all feed into the problem. Don't leave your dog in the yard unsupervised. Use pens or gates to keep him away from windows that face the street. Play white noise or calm music if your dog reacts to noises from outside.


Equipment

When walking your dog, do not use any equipment that will cause your dog discomfort or pain, as he will associate that with the sight of his triggers. This will make his reactivity worse. No choke chains or prong collars, and use a “no pull” harness if your dog pulls on leash (or a head halter for extreme pullers).


Set ups

The best way to teach your dog to be calm around his triggers is to do training set ups: recruit a person (with dog if needed) to act as a “decoy” for your dog to work around. This enables you to start training with a person and/or dog who is quiet and calm, and will go only where you direct them. By carefully controlling the set up, you can create successful practice sessions for your dog. You can also get in many, many repetitions within a short training session. As the training goes on, we’ll move from high controlled sessions to ones that mimic real walks, then to practicing in public.

If you don't have anyone you can recruit as a helper, it's possible to train your dog by just doing “stealth” training around people you see during regular walks - but it's harder to ensure success, and takes longer because of the low number of repetitions per encounter.

The training will always be done with the dog “below threshold,” meaning that he’s not negatively reacting to his triggers. If he does start posturing, pulling, growling, barking, or showing other signs of being “over threshold,” our priority is to get him out of that situation, calm him down, and then try again with the set up changed so he can be successful. This applies to dogs who are reactive due to fear/anxiety AND dogs who are over-excited/frustrated and lunging because they want to greet or play.

LR-risingstresslevels.jpg
LR-triggerstacking.jpg
 
Print Friendly and PDF
In

Leash Reactivity: Training Exercises


Exit strategies

Before we jump into set ups and working around triggers, work on these foundation exercises. I refer to these as “exit strategies” because they are most commonly used to prevent your dog from getting into a bad situation, or getting him out when he’s already starting to go over threshold. You should first practice them randomly at home and on walks, when everything is calm and there are NO triggers around. Practice until your dog responds correctly and happily to each cue.

Name game: Use to improve your dog's responsiveness to his name.

  1. Call your dog's name.

  2. Immediately feed him a treat.

U-turn: Use to cue your dog to turn around voluntarily, without stress and without alerting him that a trigger is nearby. Later on, this will also make it easier for your dog to do the Engage-Disengage exercise (see below).

  1. With your dog on leash, walk forward a few steps.

  2. Say “u-turn!”

  3. Turn around 180 degrees.

  4. Jog forward a few steps.

  5. Reward your dog for catching up with you.

Treat magnet: Use to distract and lead your dog away if he’s to too worked up to respond to the “u-turn” cue, or when you really don’t want him to look around and spot a trigger in the area.

  1. Grab a small handful of treats in your hand. There should be enough treats that your dog can lick and nibble for a while, but not so many that they’re falling out of your hand.

  2. Hold your hand into a lightly closed fist or “tunnel” shape, and place it directly in front of your dog's nose.

  3. As your dog starts to lick or nibble at the treats, lure his head to the side and have him follow the treats until he's turned around and walking away from the trigger.

  4. Let him continue to eat the treats as he's walking away.

  5. The handful of treats should act like a “magnet” attached to his nose - he doesn’t look up or away, just keeps his attention fully focused on the food.

Walking hands up the leash: Use when your dog is at the end of a tight leash, and you need to get closer to get his attention or lead him away.

  1. Place one hand in front of the other along the leash, as if you were climbing a rope. Repeat until your hands are close to your dog's collar. (Make sure that you are the one moving toward your dog, rather than pulling your dog toward you.)

  2. Use the name game, treat magnet, or gentle but steady pressure on the leash/collar/harness to turn your dog away from the trigger.

Scatter: Use to distract your dog when you are unable to completely avoid a trigger. Also use to give your dog a break and help him calm down (works best in grass).

  1. Say “scatter!”

  2. Scatter 3-5 treats on the ground and let your dog hunt for them.

  3. Repeat as many times as needed until trigger is gone or dog is calm enough to continue walk.


Desensitization and counter conditioning

This is one of the gold standard approaches to reducing reactivity, especially when it is caused by fear or anxiety. In brief, we will teach your dog that the appearance of his triggers predicts getting yummy treats. Here is an article with more information on this process and how to apply it.

  1. Dog sees trigger.

  2. Dog gets treat - sometimes just one, sometimes a stream of treats the whole time the trigger is happening/in sight.


Engage-Disengage Game

I often begin training with straight desensitization and counter conditioning exercises, but then progress to using the Engage-Disengage Game. There are two stages to this:

  1. Mark and reward the dog as soon as he looks at the trigger (engages).

  2. Let the dog look at the trigger for a few seconds and wait. Mark and reward as soon as the dog looks away (disengages) from the trigger.

Here is a lovely graphic from Alice Tong that explains the Engage-Disengage Game in detail.

If you prefer learning via video, here is one from Charleston Animal Society explaining how to teach this exercise, and here is another one from Bravo Dog Training & Behaviour.

Here is an example video of Georgia performing the Engage-Disengage Game with me while looking at another dog at PetSmart. (Yes, Georgia was very leash reactive before her training started!)

This exercise provides the dog with a specific alternative behavior that they can perform instead of lunging, barking, and so on. It gives them more control over the situation and helps reframe the training exercise into a fun game. It also gives the owner more insight into how their dog is feeling about the trigger (did the dog disengage promptly or after a delay? Are the dog’s movements fluid and controlled or fast and frantic? Is the dog even able to disengage on his own without help?).


BAT (Behavior Adjustment Training)

This is another technique that works very well when combined with counter-conditioning and/or the Engage-Disengage Game. I will often use all three in a single session, flowing from one to the next as best fits the moment and the dog’s demeanor.

BAT was developed by Grisha Stewart. It is usually done with the dog on a long line (leash that is 10+ feet long) for better freedom of movement. (Remember that the more control your dog feels he has over the situation, the more relaxed he will be, which allows for greater success in the initial stages of training.) It can also be done on a regular leash if the dog is able to keep it loose.

We start far away and allow the dog to meander around the area. We keep him from inadvertently rushing toward the decoy, but allow him to observe his surroundings until he notices the helper. At that point you:

  • Help your dog come to a stop by slowing down and then halting progress with the leash.

  • Make sure the leash is slack once your dog has stopped.

  • Wait and watch your dog's body language.

    • If your dog is becoming more tense/alert or starting to show overt reactivity toward the trigger, help him move away (use one of the exit strategies explained above).

    • If he is calmly observing the trigger, let him continue watching. (The exception is for dogs who will go over threshold if they stare for too long.)

    • When he disengages and goes back to walking, sniffing, or other calm behavior, praise and continue letting him meander around the area.

This training technique most closely resembles a “real” walk and the final behavior we want from your dog: noticing a trigger, watching for a moment, then turning away and continuing to walk with you.


Play Way

This approach, developed by Amy Cook, is different than most because rather than teaching your dog specific alternative behaviors around his triggers, it focuses on helping your dog truly relax and even play with you while out and about in the world. Here is her explanation on using social play for behavior problems. I generally recommend this technique for dogs who have many triggers for their anxiety, and have trouble relaxing and letting down their guard.

Practice playing together both on and off leash, first in the house, then in the yard. Think of your playtime as including lots of back and forth communication: are you enjoying this? Do you need a break? Would you prefer to do something else? Follow the “3 second rule” - after about 3 seconds of play or petting, pause and see what your dog does. If he engages with you, great, keep going! If he turns away or looks around, that means that he needs a break, or is concerned about something in the environment, or wasn’t into the type of play/petting you were doing. Give him a moment to look around, then ask him if he would like to play some more.

Over time, you dog will build confidence and be happy to ignore the rest of the world in favor of connecting with you in play.

Here’s an example video of myself playing with Bodi at PetSmart.

Here is an example video from Tania Lanfer of Cannon Dog Training.

Print Friendly and PDF
In

Intro to Desensitization & Counter-Conditioning

Here are a number of resources that explain the processes of desensitization and counter-conditioning in training. These are among the most simple and effective techniques for changing behavior, especially when that behavior is motivated by underlying fear or anxiety. Please watch these first two videos:

The Basic Process of Desensitization & Counterconditioning For Your Dog | Dog Training

Counter Conditioning: a Visual Explanation


Here are the most important takeaways:

  • You must break your final goal down into small steps. For example, for dogs who don’t like getting into the car, you may work on first getting within a few feet of the car with all the doors closed, then approaching while the back door is open, then taking treats from the ledge where the door opens, then off the back seat, and so on.

  • At each step, your dog should be enjoying the training. If he is reacting negatively (such as running away, being wary of the treat, growling, or barking), that means that you need to go back to an earlier step.

  • Do not move on from your current step until you see that your dog has a happy response (such as wagging his tail, looking at you expectantly, or running to you every time he hears the trigger).

  • We are most likely going to be using lots of treats during this training - here are tips about choosing healthy, effective treats.

  • If you are properly breaking down the goal into small steps, you don’t need to worry that your dog will learn to bark or growl in order to get treats - he’s not rehearsing that behavior anyway, so he’s just learning that trigger = yay, treat!

  • It is critical that you avoid putting your dog into situations he can’t handle. For example, if he tries to bite every time he is picked up, avoid doing so. If he barks wildly every time he hears the doorbell, cover the bell and put a note on your door for people to call you when they arrive instead.

    • For those times that life happens, and your dog starts negatively reacting (barking, growling, lunging, etc), you should get him out of that situation as soon as possible. That might mean that you use treats to distract him. That’s okay, as long as it’s only happening a small percentage of the times that he is exposed to the trigger. The rest of the time, set him up for success with your training sessions.

  • Watch out for trigger stacking:

LR-triggerstacking.jpg
 

Here are videos that show specific examples of behavioral issues being resolved by the use of desensitization and counter-conditioning:

Print Friendly and PDF

Using Treats in Training

Why do we use treats for training?

We must use something that will motivate the dog to change his behavior. Although anything that the dog enjoys can be used as a reward - such as playtime, belly rubs, or happy praise - treats are the most convenient in many situations. They allow you to reward many successful training reps within a short amount of time, and you can take them with you wherever you go. They’re also successful motivators for the vast majority of dogs; not all dogs enjoy playing tug, but nearly all love fresh cooked chicken and hot dogs!


What kind of treats should I use?

Very small dog looking at cutting board with tiny pieces of string cheese on it

Cut your treats into SMALL pieces!

For your standard training treats, the rule of thumb is small and stinky!

  • Size of a pea or smaller, so that your dog doesn’t fill up quickly, and they’re ready to get right back to work.

    • Most commercially-produced dog treats can be easily broken into 2-3 smaller pieces, so that you get more “bang for your buck” both financially and in terms of calories. This is particularly important for small dogs.

  • Think smelly fish or meat-flavored treats rather than dry biscuits.


High value treats

Sometimes you want to use “high value” treats to really motivate your dog (such as for coming when called from a distraction) or do more effective counter-conditioning. Examples of foods that are commonly "high value” to a dog are:

  • plain boiled or rotisserie chicken

  • hot dogs

  • other cooked meats

  • string cheese

  • freeze-dried liver or other organ meats

  • homemeade tuna fudge

Keep in mind that your dog is the one who gets to decide what is “high value” - so experiment with different foods to see what he likes best!


Using balanced dog food as treats

If you’re doing lots of intensive training, you have a small dog or puppy, or your dog needs to lose weight, it’s extra important that your treats be small and healthy or low calorie (such as boiled chicken). But another way to keep them fit and healthy is to use real, complete and balanced dog food as training treats.

  • If you’re lucky enough to have a chow hound that loves his kibble, then skip the food bowl and use all (or most) of his kibble for training!

    • For extra-small pups, you can divide the kibble into even smaller pieces by soaking it in water first. Here’s a video showing this off.

    • You can make the kibble more exciting by soaking it in chicken or bone broth, too.

Freshpet food rolls on display at a pet store

You can take all of your dog’s daily portion of food and put it into a container on the counter, and pull from it throughout the day as needed. Then you can be sure that your dog isn’t getting any extra calories.


Food in tubes and pouches

This is a great way to deliver treats to dogs that are very chompy, or when you have a small or overweight dog and portion control is extra important. You gently squeeze the tube/pouch so that only a tiny amount comes out at a time, and your dog licks it up. Some options are:

Portuguese Water Dog licking at treat pouch

Mila licking at a tuna-flavored cat treat in a pouch

Nulo pouch of pureed treat containing beef, beef broth, beef liver, and kale
Reusable pouch of lickable peanut butter for dogs
Reusable pouch of fish-based lickable cat treat
 

Carrying treats around

When you have a brand new pup at home, or you’re doing a lot of training in a short amount of time (such as when we meet for private lessons), you’ll want to have a way to keep all those treats in an easily-accessible spot. Pockets end up filled with gross crumbs, and plastic bags make distracting crinkly noises and slow you down, so my favorite solution is a treat pouch. I use the Doggone Good! Trek N Train Treat Pouch, which has a magnetic closure that is easy to operate with one hand. Drawstring treat pouches and fanny packs can also work well. Squeeze tubes have caps to keep things clean, and you can put them into a large pocket or pouch, or just hold them in your hand while walking.


But my dog gets too excited with treats!

We can teach him to have better manners! Here is a great video on teaching a dog not to “mug” you:

If your dog does well until you’re handing him a treat, and then he jumps, use the “slow treats” game:

  • Slowly lower the treat toward your dog.

  • If he keeps “four on the floor” the whole time the treat is coming toward him, then you can let him take it from your hand.

  • If he jumps up at any point, immediately lift the treat farther away. Resume slowly lowering it when he has four paws on the floor.

  • You can use this tactic any time you are handing your dog a treat, even while working on something else (like a stay or heel). You can also use it when handing your dog a toy or chew.

If your dog doesn’t jump but uses his teeth too much when taking treats:

  • Feed the treats lower down, so that he lowers his head to eat them rather than reaching up. This makes nipping less likely.

  • Move your hand slowly and steadily - if you start to yank your hand back the moment that your dog is closing in, he will start to snatch more because he thinks he needs to be fast.

  • Hold the treat firmly in your fist or between your thumb and other fingers. If your dog is too rough, don’t let the treat go! Hold your hand still and wait for him to soften up, using his lips or tongue. Praise and release the treat then, to reward your dog for being gentle.

Sawyer learns to take treats politely, no teeth on the human's hand. The video is slowed down 20% so that it is easier to see what is happening.


Kids giving treats

Children often have a hard time with the advice above - they get scared of the dog’s teeth and snatch their hands away quickly. This jerky movement is exciting to the dog, and makes him think that he has a small window of time in which he needs to grab the treat - thus making him less careful with his teeth! So have children follow these suggestions instead:

  • Feed the treat with their hand completely open and flat, with the treat in the middle. (If you’re familiar with feeding horses or other livestock, this is the same advice.)

  • Place the treat in a small bowl or plate that is then handed to the dog.

  • Place the treat on the floor instead of feeding from the hand.

  • Toss the treat to the dog. (Note that for some dogs, chasing the treat will be too exciting and lead to more rowdy behavior, so this is not recommended for all dogs.)

 
Print Friendly and PDF

Puppy Schedules

Why should you get your pup on a schedule?

New puppy owners often make the mistake of letting their puppies run wild until they exhaust themselves. This is problematic because puppies who are overly tired or overstimulated are much more likely to bite, chase, bark, growl, and generally show grumpy, aggressive, and/or frantic behaviors. It is better for the pup (and for the human!) to encourage them to settle down for regular naps before they practice those behaviors. You also want to make sure that these are deep, restorative naps - a doze here and there, that is frequently interrupted, will not improve your pup’s behavior.

Potty training is also much easier if your pup is on a consistent schedule!


How do I figure out the right schedule for my pup?

For an 8 week old puppy, I start with a rule of thumb of:

  • wake up and immediately take out to potty

  • provide a meal (in a bowl or - better yet - in a food toy, scattered around for them to sniff out, or as rewards during training)

  • provide playtime/training/exercise for 1 hour (with a potty break in the middle)

  • take out to potty

  • nap for 30 minutes - 2 hours

  • repeat

Of course you’ll adjust as needed. Higher energy pups (such as herding breeds and terriers) will need more time to tire out - BUT watch out for overstimulation leading to behaviors like nipping, barking, or chasing other pets. Lower energy pups (such as growing giant breeds and many small breed lap dogs) will need longer naps.

Extend nap time if your puppy was very tired out (such as from an extended training session or play time with another puppy), and during parts of the day he tends to be more tired. For example, it’s normal for dogs to snooze longer in the middle of the day (from roughly late morning to early afternoon).

Keep in mind that puppies typically need 18-20 hours of sleep a day!


Helping your puppy settle for a nap

Puppy sleeping soundly in a crate.

Puppy sleeping soundly in a crate.

  • Use a crate or pen to create a small, calm area for your pup to nap in.

    • Many puppies settle more easily if they can’t see activity going on around them, so try covering most of the crate/pen with a blanket.

    • You may need to place their crate/pen in a quiet area of the house, such as a bedroom. (If your puppy cannot handle being separated from you, that is a separate problem that needs specialized training to address.)

  • Give your pup a “fresh” toy (one they haven’t seen in a couple of days) and at least one chew item or food toy when you put them away, especially if they were already getting over stimulated and need help self-soothing.

  • Providing a large plush toy to cuddle with also helps them relax and fall asleep. (I believe that it reminds them of their littermates.)

  • Some puppies benefit from you putting in an item (such as a blanket) that came from the breeder’s home, or a piece of clothing that smells like their new owner.

  • You can also play calm music and try Adaptil to further help fussy pups settle.

  • If your pup whines or barks intermittently, ignore them and they will learn to self-soothe and fall asleep.

    • Note that if your dog is having a panic attack - barking non-stop, trying to escape their crate/pen, hurting themselves, or soiling their bed - that is an anxiety problem that needs specialized training to address.


Extending free time as your pup grows

You can extend awake time if your puppy has recently pottied and is still peppy without being overstimulated. If they haven’t pottied recently, use strict supervision or a tether/crate/pen to discourage accidents, and take them out again in 5-10 minutes. Then give more free time until the pup is tired or it’s time for the next potty trip. If you see that your pup is now consistently holding their bladder/bowels for a longer period (say, 90 minutes instead of 1 hour), you can move their potty schedule accordingly.

If your pup is having accidents during free time, divide it up with more trips outside and strictly supervise indoors.

Some “zoomies” (racing around with a burst of energy) in the evening are normal. If they’re a problem because your pup gets more nippy, plan ahead and provide appropriate exercise and enrichment to channel his energy. If they’re really out of control, that usually means your pup didn’t get enough exercise earlier in the day, so adjust your schedule in the future.

 
Happy puppy and owner!

Happy puppy and owner!

Final notes

Put your pup to bed and get them up in the morning at a consistent time, even on weekends.

Most 8-12 week old pups will need 1-2 potty trips outside overnight. If your pup lets you know they need to go out by fussing, you can take them out then. If they potty in their crate/pen without warning you, you’ll need to set an alarm so that you can get them out before then. Reward your pup with a treat for pottying outside, then put them back into their crate/pen without any extra playtime or cuddles.

Many puppies will have trouble regulating their behavior if they’re home alone for 8-10 hours and then awake for 6-8 hours with you; use family, friends, neighbors, walkers, and trainers to get the puppy out for exercise and enrichment while you’re at work.

Print Friendly and PDF
In

Muzzles

Why a muzzle?

Muzzles often get a bad rap because they make a dog look “scary.” However they are an important tool for keeping dogs - and people - safe. There are multiple reasons that a dog may wear a muzzle, for example:

Cai wore a muzzle when he went to the emergency room for an eye injury.

Cai wore a muzzle when he went to the emergency room for a painful eye injury.

  • The dog is fearful of strangers or dogs approaching. The muzzle not only keeps this dog from being able to bite someone, it also acts as a signal for others to give him space.

  • The dog may be friendly and social most of the time, but bite in specific contexts, such as when guarding food or his owner.

  • The dog may be too rough with biting during play, but otherwise play nicely. (One of my own dogs fits this category.)

  • The dog may bite when in pain. (One of my dogs needs to be muzzled at the vet’s if he is injured because he would bite the vet.)

  • The dog may be in the habit of picking up trash or other unsafe items and trying to eat them.

  • The dog may have severe allergies or another medical condition that could be triggered by eating things off the ground, or eating another dog’s treats.

  • The dog may be required to wear a muzzle while traveling or due to breed-specific legislation.

Whatever the reason, muzzles can be a lifesaving tool.


What kind of muzzle should I use?

If your dog will be wearing the muzzle for more than a few minutes, you should use a “basket” muzzle. This is the type that creates a “cage” around the dog’s jaws. It mostly prevents the dog from biting anyone*, but still allows him to eat treats, drink water, and pant to cool himself down.

Do not use a “soft” or “grooming” muzzle that forces the dog’s mouth shut - this is dangerous because it does not allow the dog to pant to cool down. It may also still allow the dog to nip with his front teeth!

* Note that determined dogs may still manage to nip, bite, or grab objects through softer basket muzzles. Here is an article that compares muzzle types, and will help you choose an appropriate muzzle for your dog’s temperament and specific needs.

Here is a video from dog aggression expert Michael Shikashio on choosing an appropriate type and size of muzzle for your individual dog:


Where can I buy a muzzle?

Terra wears a muzzle because she can be too rough during play.

Terra wears a muzzle because she can be too rough during play.

There are a few brands that you can find in big box stores, however these may not fit your particular dog well, especially if your dog has a particularly flat, long, or wide snout (for example, French Bulldog, Greyhound, or pit bull-type). Always measure your dog’s snout rather than going by the “suggested size” for a particular breed. For example, the Baskerville Ultra is easy to find but has limited sizing options.

If your dog is full grown, I recommend purchasing a muzzle that is more accurately sized for your specific dog. That will require getting measurements of your dog’s snout, head, and neck. If you are ordering online, check the vendor’s recommendations for where and how to measure for their own products.


Wire muzzles - good for high bite risk dogs, with the one caveat that getting “punched” by a wire muzzle still hurts:

Vinyl muzzles - good for biters and scavengers:

Solid, non-flexible, injection-molded polyethylene (plastic) - good for biters and have an optional “scavenger guard”:

Custom biothane muzzles - for lower bite risk dogs; coverage can be fuller for scavengers or more open for increased airflow:


Teaching your dog to wear a muzzle

Now that you have your appropriately-sized muzzle, you need to teach your dog to be comfortable wearing it. Unfortunately most dogs will scratch and fuss if you just put something on their face and head out. Teaching them to be okay with it is not difficult, as long as you break the process down into little steps and make it fun along the way - that’s desensitization!

Here is a how-to video by Emily Larlham:

Here is another video by Chirag Patel:

Here is one from Sarah McManaman that focuses just on the process of buckling the muzzle behind the dog’s head:

 
Print Friendly and PDF

Exercise

Many dog owners struggle to give their dogs enough exercise. Bored dogs who are full of energy are more likely to engage in nuisance behaviors like jumping, chewing, barking, digging, and pulling on leash. Here is a variety of ideas to help you find the right form of physical exercise for your dog. Note that depending on your dog’s personality and favorite activities, some of these - like fetching a ball - can wind your dog up rather than sating and calming him. You may choose to avoid certain activities for that reason, or follow them with a more calming activity like a decompression walk, tricks training, or chewing on a bone. Make sure to balance physical exercise with mental enrichment.

One other note of caution is that if your dog is not yet full grown, you should be careful with activities that are high impact or cause repetitive stress, as this can lead to growth plate injuries. If you want to take your dog for long bouts of exercise like jogging or running beside a bicycle, make sure to follow a conditioning plan and increase intensity over time, just as you would with a human athlete.


Running toy play

  • Fetch: chasing a tossed toy (often a ball), then bringing it back to you to toss again. Try a Chuck It to add distance to your throws.

    • If your dog doesn’t pick up the ball, try training a retrieve separate from playtime.

    • If your dog picks up the ball but doesn’t bring it toward you, try:

      • Play in a hallway or other corridor that encourages him to come back toward you because he doesn’t have anywhere else to go. Then use a treat or second ball to reward him.

      • After he picks up the ball, run in the other direction so he chases you. Reward with a treat or second ball when he catches up.

      • Attach a string to the ball and use it to gently reel your dog in. Reward with a treat or second ball when he reaches you.

    • If your dog brings the ball back but doesn’t drop it, try “2 ball fetch”:

      • 1. Throw the first ball.

      • 2. When your dog comes back, bring out the second ball and get him excited about it.

      • 3. As soon as he drops the first ball, throw the second one as a reward.

      • 4. Pick up the ball he dropped, and repeat.

    • If your dog brings the ball back but really wants to play tug instead of having you throw it again, try using a ball on a tug rope so that you can tug easily. Teach them to drop it separate from playtime. Examples of balls on a tug rope are the Nero Ball, Beanie Braided Fleece Ball Tug, Kong Squeaker Ball with Throw Rope, Fling Thing Tennis Ball Toy

  • Fetch on an incline: To make it more physically challenging, play on a slope. (Don’t use stairs, as that’s a major tripping/falling hazard when your dog is excited.)

  • Disc/frisbee: Same as fetch, but using a disc. Your dog may prefer this over a ball. Practice tossing the disc so it stays low to the ground, or even rolls along the ground, to discourage wild jumps into the air that may cause injury.

  • Toss a toy and run away: It doesn’t matter whether your dog picks up the toy - just get him sprinting after it, then sprinting back after you! Yes, you’ll be getting exercise as well, but your dog will be covering at least twice as much ground as you.

  • Toss a Lotus Ball or other treat-filled toy: If your dog doesn’t care about toys but enjoys treats, you can teach him how to get a treat out of a Lotus Ball, and get him chasing that.

  • Laser pointer: Some people like to have their dog chase a laser pointer like cats do, but this should be used with extreme caution as dogs are prone to developing compulsive behaviors associated with chasing lights and shadows. Most veterinarians and behaviorists advice against playing with laser pointers.


Tugging toy play

  • Go ahead and play tug, but make sure to practice drop it, teach your dog to sit politely instead of jumping up for and snatching at the toy, and only play with dog toys and not random objects.

  • If your dog has only a little interest in toys and you want to encourage him to play, try:

    • Use special “high value” toys like ones that incorporate real rabbit fur or real sheepskin.

    • Put a toy on a string and have it “run away” from your pup, then let him catch it and have it “try to get away.” This stimulates predatory behavior, which is natural for most dogs.

    • Give only very gentle tugs, and let your dog quickly “win.” Fuss over him when he wins the toy.

  • Flirt pole: A flirt pole is a like a giant cat toy or fishing pole for dogs. It allows you to whip a toy along the ground for your dog to chase and tug with. You can purchase a designated flirt pole (small dogs, big dogs) or create your own by purchasing a lunge whip at the feed store and attaching any toy dog to the end.

  • Spring pole: For serious tuggers! If your dog loves to play tug so much that he doesn’t even need a human on the other end of the toy, you can hang a metal spring from a tree or other solid object and attach a strong line and toy at the end. Your dog can tug and tug against the metal spring.


Indoor activities

  • Hide and seek: Hide from your dog while he is distracted, waiting in a stay, or being held by another family member. Then call him and let him run around and try to find you! This works well with multiple family members hiding and taking turns calling the dog.

  • Recall round robin: Make a big circle with family members and take turns calling your dog back and forth.

  • Toss treats or kibble: Let your dog chase down each piece as you toss them first to one side, then the other.

  • Indoor agility: Set up an obstacle course using furniture, cardboard boxes, and blankets! Try having your dog go under, over, through, between, and around various items. For example, he might go between the couch and wall, then under a draped blanket, then around a bar stool, then over a broomstick propped horizontally on books, then through a cardboard box tunnel!


Backyard activities

  • Backyard agility: As above, you can create your own obstacles that your dog will go under, over, through, between, and around. You can use items you already have, like broomsticks, flower pots, and deck chairs. If you like creating things, you can find tutorials online for creating PVC jumps and weave poles and wooden dog walks and a-frames. See a video with more ideas here. Or you can purchase a home agility kit online.

  • Digging: If your dog loves to dig up your veggies and flower beds, consider creating a designated digging area for him! You can use a plastic pool or create a wooden frame and fill it with play sand. To help him learn to dig only in that area, bury toys and chews for him to find.

  • Pool: Swimming is a great form of exercise. To help your dog get comfortable with the pool, practice getting in and out at the shallow end before you expect him to actually swim. If even that is scary, or you have a small dog, practice with a small plastic children’s pool first.


Outings

  • Swimming: You can find areas to let your dog paddle around or swim at Putah Creek by downtown Winters, Lake Berryessa, or travel farther out to a dog-friendly beach.

  • Hiking: Whether on or off leash, a hike in a natural area with lots of new scents beats a walk through the neighborhood any day. Check out Rockville Hills Regional Park, Browns Valley Open Space Preserve, Lagoon Valley and Pena Adobe, Rush Ranch Open Space, and Grasslands Regional Park.

  • Park: Even dogs who have trouble with coming when called can play at a grassy, open park if they are on a long line.

  • Jogging or running: If you’re just as much of an athlete as your dog, you can go jogging or running together, or have your dog run alongside your bicycle. (It’s recommended to use a Springer or similar dog attachment for your bike so that they can’t veer in front of you.)

  • Bikejoring, pulling scooter, carting: A strong, fit dog can pull your bicycle (called bikejoring), scooter, or a cart for exercise. This requires foundational training to start, stop, turn left and right, and ignore distractions.


Playmates

  • Dog park: The dog park is what many people immediately think of when they want their dog to have a romp and play. This can be a good outlet, but should be used with caution. Because there is no screening of who goes into the dog park, and not all owners are vigilant or knowledgeable, there can be lots of bullying or even fighting. In addition, the entrance to the park can be overwhelming, with everyone mobbing newcomers. The dog park should only be used for dogs who are already friendly and stable in a variety of social situations. Small dogs should not mix with unknown large dogs for safety. Here is more information on making outings to the dog park successful.

  • Play dates: Prearranged play dates make an excellent alternative to the free-for-all of the dog park. Set up one on one dates for dogs that your dog has already met and gets along with, or ones you think will be a good match. If you don’t know anyone among your friends, family, or neighbors, try searching for like-minded folks on NextDoor or local Facebook groups.

  • Group walks: For dogs that aren’t into play but do like to hang out with their doggy friends, arrange to go on a walk together, in the neighborhood or at a park.


Dog sports

There are many, many organized dog sports to dabble in, and multiple organizations that host competitions. You’ll want to ask around to find what is local to you. These are just a few of the sports that emphasize physical exertion on the dog’s part:

  • Agility: An obstacle course with jumps, tunnels, a-frame, weave poles, and more.

  • Lure coursing: The dogs chase after a “lure” (usually a white plastic bag) that is animated via a wire, and runs away like a small prey animal.

  • Weight pulling: Strong dogs pull a weighed-down cart or sled.

Print Friendly and PDF