Why do nail trimming and training at home?
Many clients are scared of trimming their dog’s nails, but it’s worth putting in the effort to learn how to do it yourself, and train your dog to allow it without fussing.
You can keep up with trimming more frequently, which is important for nail and foot health. Nails that are too long will push your dog’s toes upwards from the floor, which can cause pain and decrease stability. They are also more likely to get caught on something and get split, broken, or ripped off, requiring a vet visit.
Long nails can scratch painfully if a dog jumps on you.
You can do just one paw - or even just one nail - at a time to keep the experience short and sweet, which helps with training success.
You can save money by doing trimming at home.
If your dog is uncomfortable with nail trims, outsourcing the task to your vet or groomer will set them up to be the “bad guy.” It’s so much safer and easier on both your dog and the professional working with them to have a relaxed, cooperative experience.
Being forced to suffer through a nail trim in the name of “getting the job done” can be traumatic and make future nail trims more and more difficult and dangerous.
The anatomy of dog nails
Before you start, you need to understand the shape and anatomy of your dogs’ nails. The outside cuticle is the part you’ll be cutting back. On the inside is a blood vessel (called the quick) and nerve. You want to avoid cutting into the quick because it will be painful and bleed a surprising amount.

Image from https://standardpoodleowner.com/poodle-grooming/anatomy-dog-nails/
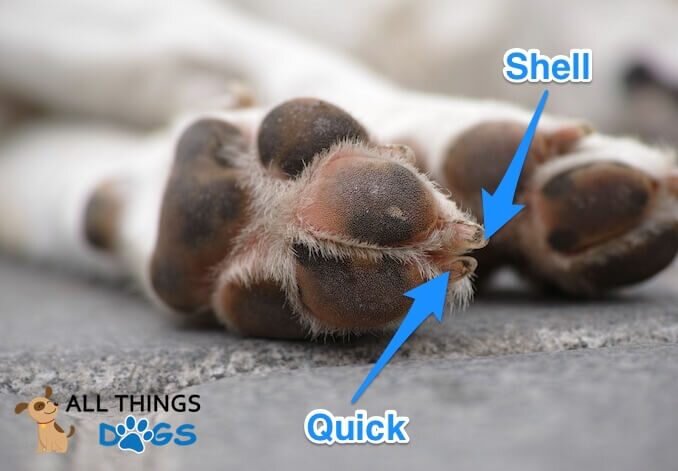
Image from https://www.allthingsdogs.com/dog-anatomy/
There are a few ways to know that you are getting close to the quick. With white nails (as above), you’ll be able to see the pink blood supply, especially from underneath. With black nails, you’ll still be able to see the difference in texture between the hard outer cuticle and the inner part of the nail from below. In addition, between the quick and the outer wall is a white, chalky layer, easily visible in dark nails. If you cut (or dremel) a little bit at a time, you’ll see this layer and know to stop. More pictures of black nails here.
Puppy nails are particularly easy to trim. You’ll see the main part of the nail form a triangle shape, with a sharp point on the front. You can safely cut off that sharp point, and leave the triangle intact.
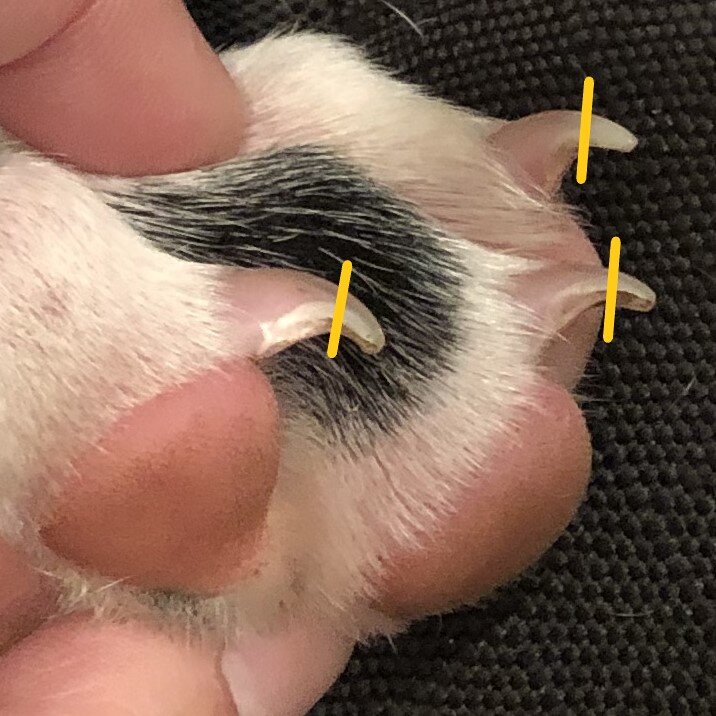
On older dogs whose nails were shorter and have recently grown out, you’ll see a similar change in shape with a little notch and a narrower front part of the nail.
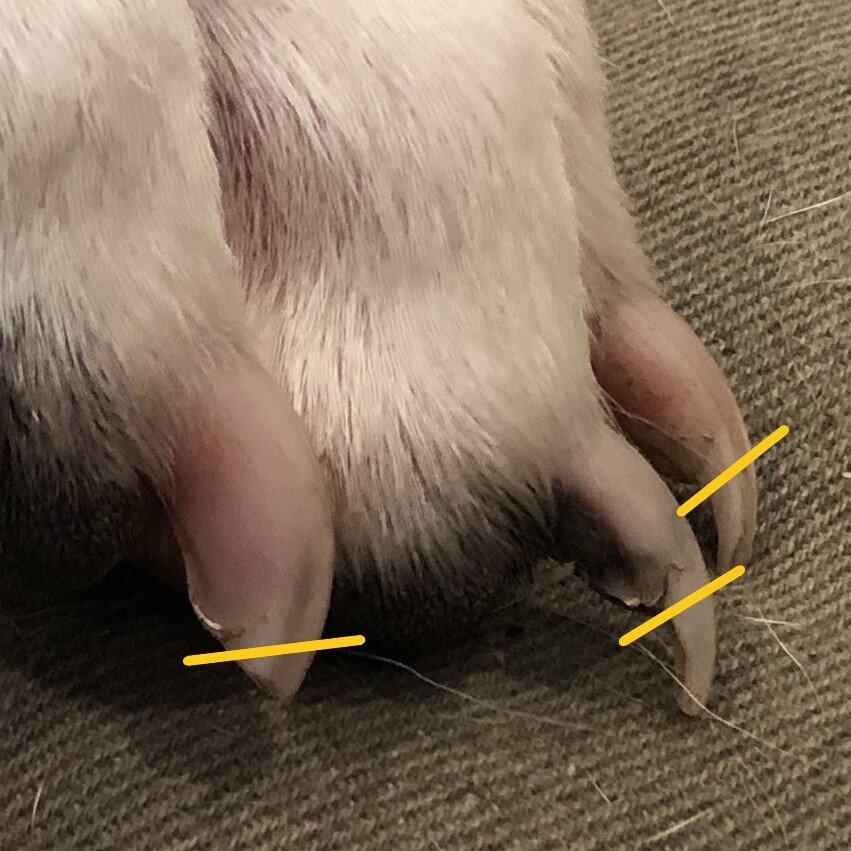
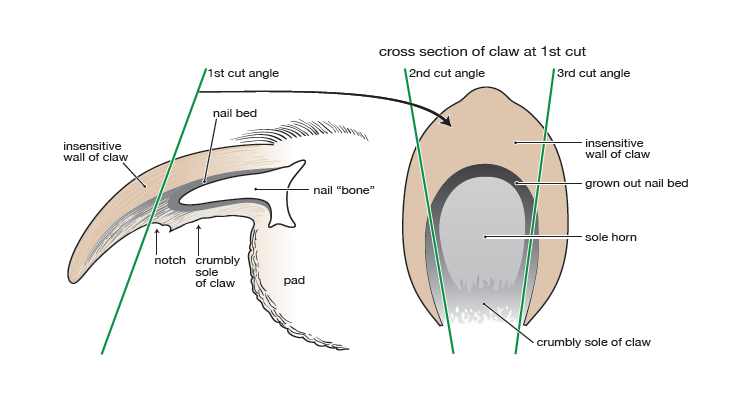
Image from https://gingercavalier.com/blog/how-to-cut-dogs-nails/
Here are three videos that provide good close ups of the trimming process, showing you where to cut and what to look for - this is helpful when using a dremel, too:
Tools and options for trimming nails
There are two kinds of clippers, known as scissor style and guillotine style. Personally, I do not like the guillotine style, as I find it harder to see what I’m doing. My favorite brand of scissor style clippers is from Safari (small and large sizes), and another popular brand is Miller Forge. Note that both of these brands, and many others, include a “guard” that supposedly keeps you from cutting too far and getting the quick. DO NOT use this, as it doesn’t account for individual variability in size and length of dog nails. Instead, use the information above and learn how to tell where each nail’s quick is.
Some people prefer to use a dremel, which is a rotary tool that can sand down your dog’s nails. Many people find that they can more easily see the quick coming and stop before they cut into it. Some dogs are more relaxed with the dremel, if they have previously been cut by clippers. However, many dogs find the noise of the tool to be scary, so you may have to teach them to be okay with it (see videos below).
If you really keep up with nail maintenance, you can use a file or buff to take a little off regularly and keep them very short and smooth (and way less painful when the dog jumps on you!).

A final option is teaching your dog to file his nails down all on his own! (See training videos below.) You’ll need to make or purchase a scratch board: a plank of wood covered with sandpaper. This is a great option for dogs that like training games, or who are particularly anxious about their nails being handled. The downside is that it’s much more difficult to train them to scratch on it with their back feet, compared to their front feet.
No matter what, you should always have styptic powder on hand during trims, in case you do cut into that quick. It promotes blood clotting and will stop your dog from dripping blood everywhere he walks. A common brand is Kwik Stop. Cornstarch can be used in a pinch. You can hold your dog’s bleeding nail in the container, or pinch some between your thumb and pointer finger and hold that tightly to the cut.
Video tutorials
If you have a puppy, start nail trim training right away! As shown above, it’s easy to see how far you should cut when they are young. If your pup is already trusting and good with handling, go ahead and get trims done while they are relaxed and sleepy.
If your pup doesn’t make it that easy for you, you’ll want to go through the process of desensitization and counter-conditioning to teach them to be comfortable with handling their paws and using your trimming tools. Here is an article all about D/CC. Make sure that you know the difference between just playing with your dog’s paws versus actually desensitizing your dog to handling:
Here is a helpful video on desensitizing your dog to paw handling, before you even bring out the trimming tools:
And one that starts with paw handling, and progresses through nail trimming:
*Note that you can combine traditional desensitization and counter-conditioning with the Bucket Game.
For extra ease of trimming, you can teach your dog to lie upside down between your legs, which gives you a great view of what you’re doing:
Here’s a desensitization tutorial for introducing the dremel:
And a few ways to introduce a scratch board and teaching your dog to file his own nails: